 Serverless 框架 OpenWhisk 开发指南
在尝试了使用 AWS 开发 Serverless 应用之后,我便想尝试使用 OpenWhisk 框架来搭建自己的 Serverless 服务。
Apache OpenWhisk(http://openwhisk.org/)是一个由IBM和Adobe驱动的开源项目,它是一个健壮的FaaS平台,可以部署在云或数据中心内。相比其他serverless项目,OpenWhisk是一个健壮的、可扩展的平台,支持数千并发触发器和调用。
OpenWhisk 简介
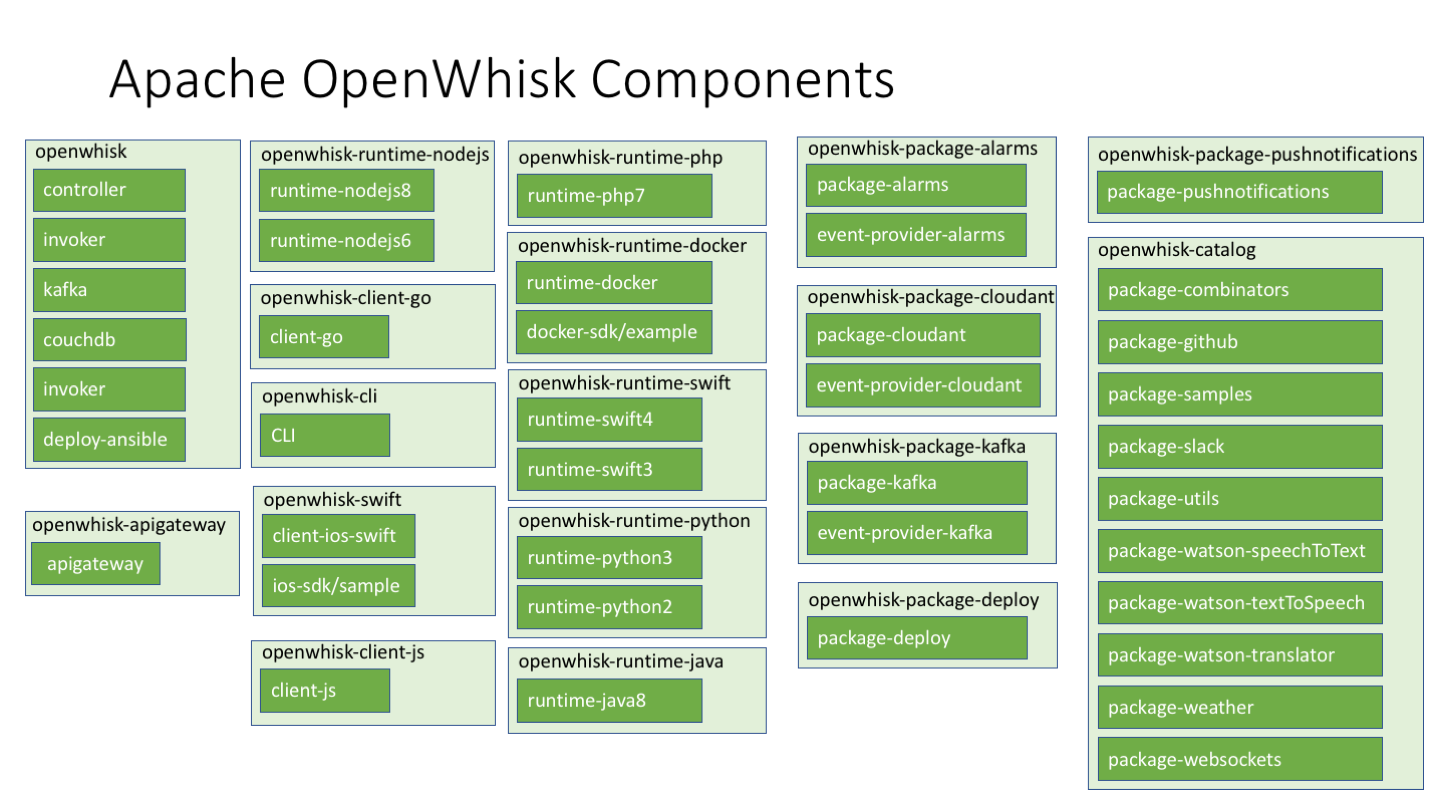
其系统架构如下所示:

对应的组件的功能如下:
- Nginx 暴露HTTP(S)端点给客户端。
- Controller 充当系统的守门员、系统的协调者,它将决定请求最终采取的路径。
- CouchDB 护和管理系统的状态。
- Consul 作为系统每个组件可访问的单一数据源。 同时,consul还提供服务发现功能,使控制器发现调用操作的实体。
- Apache Kafka 用于构建实时数据管道和流应用程序。
- Invoker 使用 Scala实现,它是处理执行过程的最后阶段。
- Docker, 几乎所有的 OpenWhisk 组件都打包和部署为容器。
macOS 搭建 OpenWhisk 环境
官网的指引很简单,但是中间还是遇到一些环境问题。
首先 clone 代码
git clone --depth=1 https://github.com/apache/incubator-openwhisk.git openwhisk然后于是虚拟机的目录:
cd openwhisk/tools/vagrant接着执行 hello 命令
$./hello

./hello: line 8: vagrant: command not found
便提示 vagrant 没有安装。Vagrant 只是一个虚拟机管理和配置工具,为了安装 vagrant,还需要先安装 virtualbox 虚拟机:
brew cask install virtualbox然后安装 vagrant,顺便也 可以安装 vagrant-manager
$ brew cask install vagrant vagrant-manager

==> Satisfying dependencies
==> Downloading https://releases.hashicorp.com/vagrant/2.0.1/vagrant_2.0.1_x86_64.dmg
######################################################################## 100.0%
==> Verifying checksum for Cask vagrant
==> Installing Cask vagrant
==> Running installer for vagrant; your password may be necessary.
==> Package installers may write to any location; options such as --appdir are ignored.
Password:
==> installer: Package name is Vagrant
==> installer: Installing at base path /
==> installer: The install was successful.
🍺  vagrant was successfully installed!
==> Satisfying dependencies
==> Downloading https://github.com/lanayotech/vagrant-manager/releases/download/2.6.0/vagrant-manager-2.6.0.dmg
######################################################################## 100.0%
==> Verifying checksum for Cask vagrant-manager
==> Installing Cask vagrant-manager
==> Moving App 'Vagrant Manager.app' to '/Applications/Vagrant Manager.app'.
再次执行:
$ ./hello
Bringing machine 'default' up with 'virtualbox' provider...
==> default: Box 'ubuntu/trusty64' could not be found. Attempting to find and install...
    default: Box Provider: virtualbox
    default: Box Version: >= 0
==> default: Loading metadata for box 'ubuntu/trusty64'
    default: URL: https://vagrantcloud.com/ubuntu/trusty64
==> default: Adding box 'ubuntu/trusty64' (v20171205.0.1) for provider: virtualbox
    default: Downloading: https://vagrantcloud.com/ubuntu/boxes/trusty64/versions/20171205.0.1/providers/virtualbox.box
    default: Progress: 11% (Rate: 2806k/s, Estimated time remaining: 0:04:16)
然后挑个网速好的时间,比如早上(经过测试晚上的下载速度比较慢),等它下载完。下载完后,便自动开始在虚拟机里搭建 OpenWhisk 环境,如安装 Docker、Git 等等的操作。
最麻烦的是等待 Docker 安装拉各种镜像。OpenWhisk系统由许多组件构建而成:
直至:
    default: +++ cat /home/vagrant/openwhisk/ansible/files/auth.guest
    default: ++ wsk property set --apihost 192.168.33.13 --namespace guest --auth 23bc46b1-71f6-4ed5-8c54-816aa4f8c502:123zO3xZCLrMN6v2BKK1dXYFpXlPkccOFqm12CdAsMgRU4VrNZ9lyGVCGuMDGIwP
    default: ok: whisk auth set. Run 'wsk property get --auth' to see the new value.
    default: ok: whisk API host set to 192.168.33.13
    default: ok: whisk namespace set to guest
    default: ++ wsk action invoke /whisk.system/utils/echo -p message hello --result
    default: {
    default:     "message": "hello"
    default: }
    default: +++ date
    default: ++ echo 'Mon Dec 11 12:09:23 UTC 2017: build-deploy-end'
我们就顺利地运行了我们的 hello world。
你也可以 ssh 到机器上:vagrant ssh,然后运行 wsk 命令试试:
$ vagrant@vagrant-ubuntu-trusty-64:~/openwhisk/bin$ wsk

        ____      ___                   _    _ _     _     _
       /\   \    / _ \ _ __   ___ _ __ | |  | | |__ (_)___| | __
  /\  /__\   \  | | | | '_ \ / _ \ '_ \| |  | | '_ \| / __| |/ /
 /  \____ \  /  | |_| | |_) |  __/ | | | |/\| | | | | \__ \   <
 \   \  /  \/    \___/| .__/ \___|_| |_|__/\__|_| |_|_|___/_|\_\
  \___\/ tm           |_|

Usage:
  wsk [command]

Available Commands:
  action      work with actions
  activation  work with activations
  api         work with APIs
  help        Help about any command
  list        list entities in the current namespace
  namespace   work with namespaces
  package     work with packages
  property    work with whisk properties
  rule        work with rules
  sdk         work with the sdk
  trigger     work with triggers
Serverless 框架 OpenWhisk 开发指南:使用 Serverless Framework 开发 OpenWhisk 应用
Serverless OpenWhisk
在上一篇文章《Serverless 框架 OpenWhisk 开发指南:使用 Node.js 编写 hello, world 里,我们介绍了怎么连接客户端与 OpenWhisk 服务器。在这里,我假设读者已经有相关经验了。
首先,我们需要先安装对应的 Node.js 模块:
$ npm install --global serverless serverless-openwhisk然后使用模板创建:
serverless create --template openwhisk-nodejs --path my_service
cd my_service
npm install
因为我们是在本地运行的服务,我们需要修改我们的 serverless.yml 文件,添加 ignore_certs 参数以忽略证书:
provider:
  name: openwhisk
  ignore_certs: true
然后,就可以继续愉快地使用 sls deploy 部署了:
Serverless: Packaging service...
Serverless: Excluding development dependencies...
Serverless: Compiling Functions...
Serverless: Compiling API Gateway definitions...
Serverless: Compiling Rules...
Serverless: Compiling Triggers & Feeds...
Serverless: Deploying Functions...
Serverless: Deployment successful!

Service Information
platform:	http://192.168.33.13:10001
namespace:	guest
service:	my_service

actions:
my_service-dev-hello    hello    node_version

triggers:
**no triggers deployed**

rules:
**no rules deployed**

endpoints (api-gw):
**failed to fetch routes**
endpoints (web actions):
**no web actions deployed**
测试服务
现在,我们就可以测试我们的 OpenWhisk 函数了:
$ serverless invoke --function hello
{
    "payload": "Hello, World!"
}
$ serverless invoke --function hello --data '{"name": "OpenWhisk"}'
{
    "payload": "Hello, OpenWhisk!"
}
Serverless 框架 OpenWhisk 开发指南:使用 Node.js 编写 hello, world
我们将介绍:如何将上一节搭建的 OpenWhisk 服务作为服务器,并使用自己的 macOS 作为客户端。然后,在这之上运行我们的 Serverless 应用
配置 OpenWhisk 客户端
获取 CLI
首先,我们需要在我们的电脑上安装 OpenWhisk 的 CLI,可以直接从 Bluemix 上下载二进制的包:https://openwhisk.ng.bluemix.net/cli/go/download/
然后将命令加到环境变量中:
$ chmod +x ./wsk

$ sudo mv wsk /usr/local/bin
为客户端获取密钥
接着,我们需要到我们的 vagrant 虚拟机,为客户端分配一下密钥。使用下面的命令登录:
vagrant ssh然后,获取密钥:
$ wsk property get --auth

whisk auth		23bc46b1-71f6-4ed5-8c54-816aa4f8c502:123zO3xZCLrMN6v2BKK1dXYFpXlPkccOFqm12CdAsMgRU4VrNZ9lyGVCGuMDGIwP
在客户端设置
先看一下命令:
wsk property set --apihost http://192.168.33.13:10001 --namespace guest --auth 23bc46b1-71f6-4ed5-8c54-816aa4f8c502:123zO3xZCLrMN6v2BKK1dXYFpXlPkccOFqm12CdAsMgRU4VrNZ9lyGVCGuMDGIwP正常情况下 apihost 应该是 192.168.33.13,并且没有 10001 端口。但是好像我的配置有问题,2333。
可以先试试使用能不能列出系统的包:
$ wsk package list /whisk.system

packages
/whisk.system/github                                                   shared
/whisk.system/combinators                                              shared
/whisk.system/slack                                                    shared
/whisk.system/watson-textToSpeech                                      shared
/whisk.system/utils                                                    shared
/whisk.system/watson-speechToText                                      shared
/whisk.system/websocket                                                shared
/whisk.system/weather                                                  shared
/whisk.system/samples                                                  shared
/whisk.system/watson-translator                                        shared
接着,就可以进入下一步了。使用 Node.js 创建一个 hello, world。
OpenWhisk Node.js Hello, world
1.创建我们的 hello.js
function main() {
   return {payload: 'Hello world'};
}
2.创建操作
$ wsk action create hello hello.js

ok: created action hello
3.触发事件
$ wsk action invoke hello

ok: invoked /guest/hello with id a3ea5f68844248e9aa5f68844288e98d
4.查看返回结果
wsk activation result a3ea5f68844248e9aa5f68844288e98d就这么简单。
OpenWhisk Node.js 传递参数
接下来,让我们看一个参数的例子:
function main(params) {
  return {
    payload:  'Hello, ' + params.name
  };
}
然后更新我们的操作:
$ wsk action update hello hello.js

ok: updated action hello
接着,就可以触发我们的操作:
$  wsk action invoke --result hello --param name Phodal

{
    "payload": "Hello, Phodal"
}
当然,它可以探索的地方仍然有很多。